The Unofficial Help for the Medieval Heroes II
Game Editor
Intro:
The Legal Stuff:
The game
editor is copyrighted by Arcona Magi, creators of Medieval Heroes II
Be forewarned, I like to talk, use the index to skip around my jabber.
If your needing help, best place to go is the Medieval Heroes II
Forums
Drop a note, pitch a fit, or give them all a Howdy Dowty, There
all good guys and gals and some one can help guide you through the
tough spot.
My Thoughts:
First
let me say I am not an expert at the Game Editor, but I found it vary
intuitive and easy to learn, if you spend fifteen minutes playing
around with the sample missions, you may find you don’t really
need to read much of this, but since I like to be heard, I’ll
write on any way.
Getting Started:
Install issues:
That’s
easy, the game editor does’t need an installer, just unzip it, place it
someplace, preferably on your hard drive and your good to go, just
launch “MH2MissionEditor.exe” to start.
Did I
mention this software is for Windows? Sorry Mac guys, go
down the hall and find some geek using his Windows LapTop their mom
gave them as a doorstop and borrow it.
Personally
I like loading new software, its like driving a new car, pushing
buttons, tweaking things, seeing what it does, and finding out if I can
crash it, the software that is, not the car, that’s another
story.
Now load up one of the samples and look around, making a new mission is not really as daunting a task as it may look.
Ok,
that’s enough, close the editor, if you really want to make a new
mission the real work begins outside of the game editor.
(back to top)
The Map
The
Game Editor uses bmp’s, not gif's, or jpeg’s, although I
will tell you how you can start off with one of those latter in this
text, but first you need a graphic program, any will do, even that
cheesy little MSPaint program that comes with Windows, I use PaintShop
Pro 7, yes I know its old, but its paid for and it works for me.
Basic Colors:
The Game
Editor will recognize any and all colors, but two colors are used for
specific objects, water and non-playable land areas, for all water use
pure blue, a blue with a RGB value of 0,0,255 the other specific color, for the non-playable areas,
is pure green with an RGB value of 0,255,0
All
other colors are treated as playable areas, each playable area is
separated by the others not by black lines or any other divider, just
simply by having the other area a different color. And its not
required to have every province a unique color, you can use four or
five colors alternately to define all provinces, load up the sample bmp
Muscovy.bmp in your graphic program and you can see how pure red (RGB
255,0,0) is used repeatedly throughout the map for playable provinces.
I’m sure you get the idea.
Ideas – Historic, Real or Fantasy
Of
course the hard part is figuring out how or what to map, you can start
off copying a real map and colorizing it, downloading and colorizing
it, or make it up on the fly, one technique would be to draw a map,
scan it and colorizing it.
Map Tips:
Size:
well don’t really know what the size limits are, but 640x480 is a
good place to start, create your land of enchantment and resize from
there, you don’t want to leave too much un-used map space, doing
so will draw criticism from Ancient
in the official forum, I happen to
like my over sized maps, and I dont mind scrolling around the place,
and so what if I show too much of France, an un-playable France at
that, so whats the big deal Ancient, afraid you'll get a cramp
scrolling my tooo big map!! and yes, your right, I
don’t take criticism well.
Rivers:
Although
not required, they are a good means of blocking movement from one
province to the next, forcing armies to go around, look at the sample
map Europe14th.bmp and you can see how rivers are used to block, and
you can see how bridges are used selectively to allow movement, even
across larger bodies of water as in the map NorthernLands.bmp.
Now get creative and make a map, when you’re done, come back and we will move on to the Game Editor.
(back to top)
Starting A Build
Basic Controls
Loading Map and Checking Paths:
Loading a map is easy, just start a new project and follow the dialog to your map.
Once
your map is loaded lets do a quick check to insure all is ok, if the
first thing you notice is the area that should be water is gray and not
blue, then the color you used for the water in your map was not pure
blue (RGB 0,0,255) but instead something else, perhaps you were
thinking of the Muddy Mississippi or some other pollution, stop here
and go back to part one.
Now
check the area you wanted to exclude from play, this should be green in
the Game Editor, if that is gray, then the color you used is not pure
green (RGB 0,255,0) Once again go back to step one.
If your
water is showing blue, the “neutral” provinces are green, and all
the other provinces are gray, then your map should be ok, let’s check movement paths to see
if everything is connecting the way you wanted.
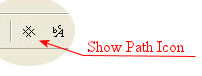
The
green lines you now see on the map you loaded are army movement paths, with this you can see if the
rivers you created are really blocking movement, and the bridges you
added are allowing movement, you can pull up one of the sample maps to see
this if your own map does not have rivers.
Of
course if any of the movement paths or blocks are not what you were
thinking of, your forced to go back to step one, making a map, the Game
Editor has no graphic editing capabilities.
Once
your satisfied with your water, the sissy neutral provinces and the movement
paths, lets give the file a name and save this puppy before we screw it
up too bad.
(back to top)
Province Creation:
Naming:
Now load up your map again and click on the province tab, you could just use the default names of “Noname
x” for all the provinces, but that’s boring, go ahead and put that crown on your
head and act like a king and give everything a name.
Now
you’ll notice as you select “Noname x” you will see
the province highlighted on the map you loaded, this seems self
explanatory, it works the other way as well, click on a province on the
map, and that province properties pop up in the properties window, now
move your cursor down to the “Selected Province(s)
Properties” box and click on the “Noname x” right of
the “Name” heading, you do know the “x” is
really a number right?
Lets not
worry about any of the other properties just yet, we will get to those,
but after you give it a name instead of hitting “enter” and
discover nothing seems to happen move cursor further down to the
“Selected Provinces Info” box and click on the resources
icon
Resources:
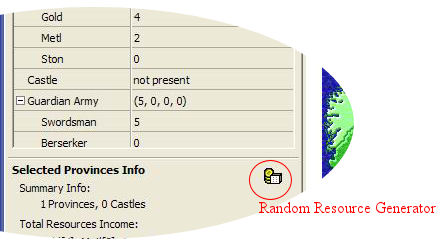
This
will give your newly named province a random mix of resources, most of
the time this may be good enough for game play and will only need to be
adjusted for fine tuning game play. Of course you could always
set the amount of gold, metal and stone manually, but for now, go ahead and click
the Random Resource Generator button.
Ok, stop clicking the resources icon and finish naming all your provinces.
There are a couple of other tools you can use to fine tune the look of
each province, Castle display mode, and Army Placement mode, these just
allow you to decide where the icons show up during game play.
Last note on Provinces, just to the right of all the provinces you’ll see these two icons
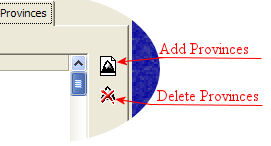 With a
province selected clicking the “Delete Province” icon will
convert that province to green space (Neutral Territory) it will still
appear gray on the map, but checking the army path icon on the tool bar
will confirm its no longer in game play, to get it back don’t
bother trying to get the “Add Province” button to do
anything, that’s why its called a beta.
Your best to leave these two alone and use your graphic editor to add or create green space.
With a
province selected clicking the “Delete Province” icon will
convert that province to green space (Neutral Territory) it will still
appear gray on the map, but checking the army path icon on the tool bar
will confirm its no longer in game play, to get it back don’t
bother trying to get the “Add Province” button to do
anything, that’s why its called a beta.
Your best to leave these two alone and use your graphic editor to add or create green space.
(back to top)
Creating Heroes:
Naming:
OK, good players are not born but created right?
I’m
sure you see the tab that says “Players and Domains”,
select it, You now see these really cool names like “Player
1” and “Player 2” We have to change these, first use
the check boxes to define how many players you will have, Hopefully
your crown is still on your head so you can come up with names for
these guys.
Skills & Such:
Once the
naming is done, lets set some skill levels, you have Melee,
Builder, and Stealth, by default each skill level is 2, and of course if all
were equal in the game that would be boring, so readjust the skills
keeping in mind the program will not allow the skills to exceed 6, so
you need to reduce one before you add to another.
As far
as the difference between a player that has a high Melee skill and a
low Stealth skill, and one that is low Melee and high Stealth, figure
it out, you came this far, I cant spell it all out for you.
“Playability”
is the next setting, this allows you to decide if this player must be
human, can be human or computer controlled, or strictly computer
controlled.
Ok, get that grin off your face, making a game with only computer controlled players would not be vary fun.
Under
Playability is the “AI Type”. You have Standard,
Builder, Warrior, and Cautious, you can mix these up or leave all at
standard for now and readjust latter to help balance game play.
Now
comes the Treasury, I’m sure you have played the game more then
once by now, so you know what resources can do for an army, the
Treasury settings are what your hero is starting off with, want to make
things really hard, give a computer controlled player lots of resources
and see how fast you get crushed.
Below
the Treasury are the Unit Types this player has access to, other then
unit 1, the standard Swordsman, each other unit type has a pull down
window. Again these settings can be used to adjust game play, if
one player seems to get crushed a lot, change the Archers to Long
Bowmen and see if that helps.
Below
Unit Types is Campaign Army, this adjust how large each players
starting army is, wow, I think this is another one of those settings
that can be used to adjust game play.
(back to top)
Assigning Provinces to Heroes (Owners)
Ok
the boring stuff is done, now the fun begins, go back to the province
tag and use your mouse to select a province on the map, doing so will
bring up the provinces properties, now when you click on the word
“none” next to “Owner” a drop down menu will
appear showing your players, if you want to give up this province to
some one select them now.
Once a
province is assigned to a player additional properties are presented, such as, “Guardian Army”, again I am sure you played
the game enough to know what that is, you can leave a token force there
or not, its your game.
Right
above the Guardian Army is Castle, clicking the space to the right will
bring up a check box, if so selected additional properties are
presented, most are fairly self explanatory, Hit Points refers to the
condition of the castle at game start.
Now of
course you need not assign all provinces to a player, you can if you
wish to start the game off with everything all ready spoken for, or you
can start off with each player only holding one province, or start off some where in between.
A note
on Catapults, you will see the pull down menu go from none to 4, but
only the capital of each player will have 4, all other castles will
only mount 2, not sure what the thinking is behind that one, but thats the way it is, get over it.
Now another
note on Castles, you can place a castle on any province, not just the
province assigned to a player, the castles on provinces not assigned to
a player will be in the game, its sort of like left behind and
abandoned stuff, you wouldn’t want to leave a lot of stuff there,
like a bank or metal mine, and the castle should be left with a low hit
number, but hey, its your game right?
(back to top)
Assigning Capitals:
Well,
every player must have a home, with out one how could he lose, there’s nothing to capture, so move back to “Players and
Domains”, now when you click on the space right of
“Capital” the drop down menu will list all the provinces
you assigned to that player, selecting one as this players capital will
place a four tower icon on that territory, regardless of the castle
setting you left behind when setting up the provinces. (thats the castle that will have 4 catapult towers if so selected)
Get on with it, give all your players a capital.
(back to top)
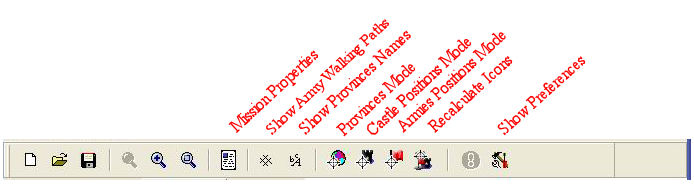
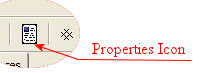
Mission Properties:
Wow,
believe it or not we are almost finished, now we need to set the
properties, really only one needs to be set, the mission name, click on
the properties icon
 By now
you should be familiar with the programs menus so change “My
Mission” to something a bit more original, like Dark Island, or
Clash of Mace, or Strip Search ... woops, thinking of a different game. You get the idea, this name sets the database and
is the name the game sees on the “Select Game” menu when loaded on the PDA
One idea
here is to just call your game Temp that way if it really
blows, your next try also named Temp will simply over
write the last one, and if your second mission really blows, maybe you
should just play the game and leave the mission creation to some one
that does’t really care if their mission really blows.
Underneath
Mission Name is Author, well that should be you, unless your worried
other people will think your mission really blows, if
that’s the way you feel then back up one paragraph.
Next is
Author Notes, the built in text editor will not allow you to put a lot
of text here, don’t know why, some of us like to jabber and write
and when we get in the mood could really fill in a lot of text with
meaningless thoughts and other rambles, I mean how do they get off over
at Arcona Magi thinking three short lines are all that’s required
to allow the author to dump his notes in, hell I could write a book of
notes over the thoughts I put in mission creation, or at least a short
story, and if my girl friend stays mad at me any longer, that short story
will be vary long, and .. woops getting way off track, sorry.
Under
Mission Notes is the Short Description, and this is more important than
first glance, of course you don’t have to say anything, but this
description is displayed on the handheld in the select game menu, and
it gives you a vary small window, basically 8 lines of 23 characters
are all that is displayed on the select game menu, and with word
wrapping you will end up with less then 23 characters per line.
The best way to format this is use your favorite text editor and resize the window down to 23 characters across. I use PSPad, its free and will also help you fine tune HTML really easy.
Next two properties are fairly self-explanatory, what to say when you win, what to say when you lose, you get it.
By now
you should be familiar with the programs menus so change “My
Mission” to something a bit more original, like Dark Island, or
Clash of Mace, or Strip Search ... woops, thinking of a different game. You get the idea, this name sets the database and
is the name the game sees on the “Select Game” menu when loaded on the PDA
One idea
here is to just call your game Temp that way if it really
blows, your next try also named Temp will simply over
write the last one, and if your second mission really blows, maybe you
should just play the game and leave the mission creation to some one
that does’t really care if their mission really blows.
Underneath
Mission Name is Author, well that should be you, unless your worried
other people will think your mission really blows, if
that’s the way you feel then back up one paragraph.
Next is
Author Notes, the built in text editor will not allow you to put a lot
of text here, don’t know why, some of us like to jabber and write
and when we get in the mood could really fill in a lot of text with
meaningless thoughts and other rambles, I mean how do they get off over
at Arcona Magi thinking three short lines are all that’s required
to allow the author to dump his notes in, hell I could write a book of
notes over the thoughts I put in mission creation, or at least a short
story, and if my girl friend stays mad at me any longer, that short story
will be vary long, and .. woops getting way off track, sorry.
Under
Mission Notes is the Short Description, and this is more important than
first glance, of course you don’t have to say anything, but this
description is displayed on the handheld in the select game menu, and
it gives you a vary small window, basically 8 lines of 23 characters
are all that is displayed on the select game menu, and with word
wrapping you will end up with less then 23 characters per line.
The best way to format this is use your favorite text editor and resize the window down to 23 characters across. I use PSPad, its free and will also help you fine tune HTML really easy.
Next two properties are fairly self-explanatory, what to say when you win, what to say when you lose, you get it.
(back to top)
Saving & Compiling:
Well
we have saved the mission file at least once right? I mean
come on, we are all using Windows so we all know what data loss is all about,
so go ahead and save the file again.
When your ready to compile the mission just click “File” – “Compile Mission for PDA”
Follow the dialog and you will create both the Palm OS version "game-name.pdb" and the Pocket PC version "game-name.pak", and now your done, well you do need to load it in your PDA first, then your done.
And if the game really blows, just open the game file and “tweak” city.
(back to top)
Loading Missions:
Of course you will need to load
the mission to play it and up to this point I had assumed you knew how
to do that, if your using a Palm OS handheald just use your Palm
installer as you would any other program or data base, if your using a
Pocket PC device you will need to copy the game-name.pak file into the "Data"
subdirectory created when you installed the game Medieval Heroes II.
if you used the default directory the location would be "\Program Files\Medieval Heroes II\Data" you can use the "explore" option on your ActiveSync to locate the directory
Remember, the .pdb file will only work on Palm OS units while the .pak files will only work on PPC units, and if you have a Linux handheald what the hell are you doing reading this?
Objectives And Design Notes:
Well
of course the first objective is to have a cool mission, one that
offers a challenge, but is not imposable. The guys at Arcona Magi
did a great job in balancing the five missions that came with the game,
balanced to the point that it does’t really matter where you
start, the same tactics you used before to rule the day will work once
again.
This is
a good thing, but vary hard to achieve, I on the other hand prefer to
keep things a bit out of balance, which requires different tactics to
win depending on where you start.
Earler in this text I pointed out different things to help ballance the
game, there is no reason why all your players must start off with the
same number of Provencess, same size army, same AI setting, or the same number of
resourcess. You can use all of these to provide a handycap to
one, or criple another to bring your mission into ballance.
(back to top)
What to do with Missions:
Well
have fun and play them of course, post them and share with other is a
thought, or email them to me and I’ll post them and share with
others, at this point in this text I don’t really care any more,
I’m getting tired.
Deleting Missions:
Well
for this your on your own, there are no built in mechanism to deleting
add-on games once installed, of course deleting “Medieval Heroes
II”
from your PDA will delete them, but thats a little radical for getting
rid of a mission that really blows, so deleting just the add on
missions might be a little harder, one idea is to use your favorite
file editor and search the database of your PDA for the mission file, I
haven’t tried this yet, I’ll let you know if it works.
(back to top)
Closing Thought:
Not
much to say here, I’m done and not about to edit or proof this
text, you get it as-is for now, my girl friend is about to wake up and
I know we are going to have that whole “Quality Time” issue
come up again, I tried the argument last night “But Sweetie, I
sleep next to you six plus hours a night, does’t that
count?”
That
explains why I was able to sit on the couch all night writing this, the
argument didn’t work, so dont try that one your self.
Any way, have fun.
Comments and grips should be directed at the official forums, I take no responsibility for my late night ramblings.
ErstO out.
---eof---